UNIQUE FACE PAINTING DESIGN, EXTREME FACE PAINTING - FACE PAINTING FOR KIDS AND FOR GIRL UNIQUE FACE PAINTING DESIGN, EXTREME FACE PAINTING - FACE PAINTING FOR KIDS AND FOR GIRL UNIQUE FACE PAINTING DESIGN, EXTREME FACE PAINTING - FACE PAINTING FOR KIDS AND FOR GIRL UNIQUE FACE PAINTING DESIGN, EXTREME FACE PAINTING - FACE PAINTING FOR KIDS AND FOR GIRL UNIQUE FACE PAINTING DESIGN, EXTREME FACE PAINTING - FACE PAINTING FOR KIDS AND FOR GIRL
Showing posts with label painting. Show all posts

Thursday, October 29, 2009

Easy Ideas for Halloween Face Painting

Halloween is such fun for kids of all ages, and adults too. Here are some face painting ideas to get you in the Halloween spirit.

Halloween face painting idea 1: pumpkin

A bright orange pumpkin painted on each cheek. Black paint used to paint eyes, nose and mouth. A light grey would be used to show the ridges of the pumpkin as well as its outline.
An alternative would be to do a full face pumpkin with an orange face base (blending a darker orange shade over cheekbones), black triangle shape over the eyes (extending above and below the eye area), a black nose and a large black mouth (need to cover more than just the lips).

Halloween face painting idea 2: skull

A full face design. Has a white face as the base, large black 'panda' eyes, black and white vertical stripes on the lips (with the white stripes wider than the black ones) and a trickle of red from one side of the mouth (to indicate blood).

Halloween face painting idea 3: vampire

A full face design. A white face base, bright red lips, fangs coming out of each corner of the lower lip (outline is light grey, fill is white, and tip is red to denote some blood), eye lids are smoky grey (right up to and over eye brows), eye brow then exaggerated with black sweeping strokes.

Halloween face painting idea 4: bat

A full face design. A white face base, bat's face painted on forehead above the nose (it's in black with light grey for eyeballs, and for some definition in ears); the bat's body is painted in black on the nose and ends at the base of the nostrils (use different shadings of black; the bat's wings extends out from head and body and covers the eyes curving up towards the temple and down the outside of the eye to mid cheek (again use different black shadings and some fine dark grey strokes to paint some definition into the wings); the lips are painted in dark grey with an exaggerated upward curl at the corners.
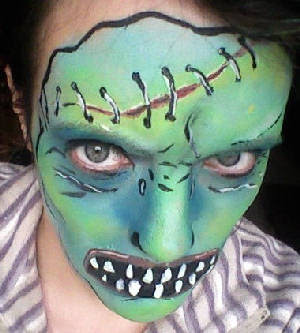
halloween face painting


Thursday, July 23, 2009

Gilty Conscience Finger Face Paints Wand (kids face painting)

Colorescience - Gilty Conscience Finger Face Paints Wand - Clear, transparent colore with gilded accents of precious metals. Glides on like satin, dries like velvet. Efficient and effective airless pump container, use concentration sparingly.


See Price: Gilty Conscience Finger Face Paints Wand


Use on face, cheeks. Eyes or lips... alone, over and/or under other makeup. Nourishing aromatherapy oils & herbal extracts, especially formulated to sooth rosacea.

Available in 4 shades:

Betrayal: blushing burgundy with golden gilt
Deception: deceiving bronze-pink gilded with gold
Scandal: clearly coral gilded with platinum metallics
Seduction: for the scarlet woman, gilded with iridescent silver


Monday, July 20, 2009

Party Pack Kids Face Painting Kit (preschool party)

Party Pack Kids Face Painting Kit. 6 Color Paint Palette; 4 Glitter Gels; 2 Water Based Sparkle Colors; 3 Face Painting Brushes; 4 Sponges and a Full Color; 16 Page Face Painting Guide. Washes off easily with soap and water. Non-Toxic. Made in United Kingdom.


See Price: Party Pack Face Painting Kit


This face paint was great! It was my first time using face paints and I would not hesitate to buy it again. The quantity of the paints went a long way and they looked great once painted on the kids. The best thing is that it washed off so easily.

Features:
• Create excitement and fun at your next party
• Paints 60 full faces with 2mL each of black, white, red, yellow, green and blue face paint
• Also includes a glitter palette of sparkle pink, sparkle orange, 4 glitter gel colors, 3 brushes, 2 sponges and a 16-pg. guidebook
• Water-based paint; cleans up with soap and water
• Manufacturer's Suggested Age: 5 Years and Up
• Number of Players: 1 Player


Friday, July 3, 2009

Klutz Body Crayon Book - Best Kids Face Painting Kit

Hi. I saw that this product had only one less-than-stellar review so decided to put in my own two cents. I love Klutz Body Crayon Book. These crayons are so much easier to use than the palette-type face painting kit also available by Klutz.


The crayons are easier to control and the pigment is more opaque on the skin. It's also a lot neater to use the crayons since a brush is being dragged from one palette of face paint to another, muddying the colors. My kids (3) and pals liked to draw on their hands and arms and these were perfect for that. I never buy or recommend any other set now. I am so happy I can get them here on Internet Shopping Store

• Winner of Parents' Choice Gold Award and Oppenheim Toy Portfolio Gold Award
• High-quality cosmetic pencils for clean, bright lines of color
• Book is packed with tons of inspirational ideas
• Easy to wash off
• For ages 4 years and up


Thursday, May 28, 2009

Graftobian 32250 Face Painting Glitter Gold - I love it!

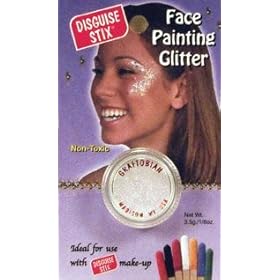
Available in eight different colors. Face Painting Glitter is ideally used with Disguise Stix Face Painting Make-Up (sold separately). Also used with Colored Latex (sold separately) for fantasy make-up. 1/8oz. screw top container with spill-proof sifter. Available in the following colors: Opalescent, Silver, Gold, Red, Orange, Green, Blue, and Purple.

Perfect for showing team spirit at your next sporting event or putting a finishing touch on your Halloween costume. Pick up a stick in every color and let your imagination go wild! Also look for Face Painting Glitter in Cool Copper and Black (each sold separately). We cannot accept make-up products for return unless they are in their original packaging, unopened and sealed.Material: Polyester Mylar Glitter DustDimensions (LxWxH):5.5 x 3 x 1


Made with the Best Quality Material with your child in mind.
Top Quality Children's Item.


Tuesday, January 6, 2009

Looking for a Free Face Painting Idea

Face painting could be a fun hobby especially when you are working with kids or preparing for special events like birthday parties. It could also be a means to boost your finances. The best thing about face painting is that almost anyone can do it-from teens to adults and beginners to advanced. Now the question is where to look for a free face painting idea. Techniques may be something you do need to invest in and learn over time just like any skill, but simply looking for ideas shouldn't be that hard.

Face Painting Idea

You can find your free face painting idea on the Internet. Start by keying in "face painting ideas" or "face painting designs" into the search engine and familiarize yourself with common themes if you are a beginner. You can also search specifically for images so that you can quickly scan over some visuals to save into your computer.

After researching on face painting designs, start searching for "face painting materials" or "face painting supplies." The purpose here is to find other possible materials you can use to enhance your face painting idea. For example, you may find that glitter or body jewelry can actually be used to make your idea even more creative.

Face Painting Idea
Furthermore, you can find a free face painting idea in your local art and crafts store as well as in the library. Scan through some body art, face painting and coloring books. Going through stencil cutouts is also a good idea if you'd like to know basic and popular shapes to use on the face. Sometimes all you need is an outline and then you can decide on a color combination. One of the major points of face painting is that you can be as creative as you want with color, just as long as you incorporate the right techniques to prevent smudging. If you'd like to familiarize yourself with color combinations, look for color tables or wheels in the art and crafts store.

cat face painting stencils for face painting tribal face painting christian face painting children


Friday, December 19, 2008

Face Painting (Make-up) Removing Tips

There are two types of makeup-oily and non-oily. Non-oily makeup stains come from eye shadows, blush and powdered makeup. For oily makeup stains (like cover up), usually liquid dish soap or shampoo will remove these makeup stains, but when it won't sprinkle baking soda directly on the makeup smudge, then brush the area with an old wet toothbrush until the makeup is gone.


Oily makeup products include mascara, liquid makeup, rouge and lipstick. Most makeup can be removed from clothing if treated properly. Avoid staining your clothes when getting dressed by hanging a handkerchief over your face before pulling on a shirt or using your hand to hold the collar away from your face. Be careful not to stretch the collar, though.

If the garment is dry clean only, use "Energine Cleaning Fluid" directly on the spot. There are several things you can try to remove lipstick stains from clothing. First try rubbing the stain with a non-oily makeup remover. Select a cleanser suitable for your skin type that has also been tested for the removal or breakdown of makeup. Some soaps and cleansers don't thoroughly cleanse your skin of makeup. First, remove eye makeup.

Using a cotton ball or wash cloth, apply a dab of eye makeup remover, and gently cleanse the eyes and area under the eyebrow. Clean until all traces are removed. This is helpful with taking off eye shadow, eye liner, and mascara. Remove waterproof mascara and eye liner using baby oil or baby shampoo.

Second, cleanse the face. Do not cleanse face or neck with soap. Splash your face with lukewarm water, the best temperature for lathering up and facilitating the breakdown of makeup. Cleansing the face should also include the neck and area behind the ears because oils can accumulate. Apply the lather to your entire face and rub gently, concentrating on the places where you applied makeup. Spend about a minute retracing your path to ensure that you've cleaned all areas. Lipstick is an oily dye stain, so rub in vegetable oil with a cloth. You can also use mineral oil or WD-40 lubricant. A non-oily stain might come out when rubbed with a baby wipe or a clean cloth that has been dipped in liquid detergent. If that doesn't work, moisten a rag with shampoo or dish soap and try dabbing at the stain.

Makeup removing tips

1. Cleansing the face should also include the neck and area behind the ears because oils can accumulate.

2. First, remove eye makeup. Because some eye makeup is extended wear, water alone will not remove all traces.

3. Remove waterproof mascara and eye liner using baby oil or baby shampoo.

4. Second, cleanse the face. Do not cleanse face or neck with soap.

5. Rinse your face multiple times to ensure the removal of the cleanser and makeup residue.

6. Pat your face dry with a towel.


Monday, December 8, 2008

Natural Mineral Makeup and Face Painting

Natural mineral makeup and face painting has been around a few years, but it seems the average person either hasn’t tried them, and many have never heard about them. Basically, they are various minerals crushed to a very fine powder and used as cosmetics. They are in a powdered type form.


The main properties of mineral makeup and face painting are gentleness, long lasting, pure, and many have almost a healing type of action to various skin conditions. Of course you will have to experiment to find which brands are your favorites.

Personally, I am hypothyroid which means I have super dry skin, alligator skin. Doesn’t matter what type of skin care products, etc. I use, I have flaky skin. All my life, no matter what makeup I used, it would be completely absorbed (thus disappearing) after about only 2-3 hours of wearing it. I was also very nervous about mineral makeup because with having super dry skin I avoid powders of all kinds, plus I was worried about it making the flakiness look even worse. I was SO stunned when I first started using mineral makeup on my own skin. The first thing I noticed was after 12 hours of wear, it was still there! No makeup has done that in my entire life. The other thing I noticed was it did not look flakey at all, but very fresh and light. Another benefit of mineral makeup is truly it feels like you are not wearing any cosmetics.

I also have the challenge now of rosacea (extreme redness due to intense facial flushing). I have found the brand Aromaleigh to be the best on my skin. It seems to be one of the gentlest of mineral cosmetics as far as foundations are concerned. They also carry a wonderful corrective color of green that you can use under the foundation. Green cancels red, which is why it works on rosacea skin to cover the redness, yet be very gentle at the same time. I tend to prefer Bare Esenctuals however for their blush & eyeshadow colors, they are very beautiful and perform so well.

Whatever brand you go for, here are a few tips for using it.

1. Usually less is better. They are very concentrated, so a little goes a long way. It’s common to use way too much at first. You can always add another light layer on top if you go too light at first.

2. Invest in some good quality brushes. They make all the difference in the world, be sure to gently wash them regularly.

3. If after using small amounts, with good quality brushes, things still don’t look right, or you’re not thrilled, next look at the possibility that you’re simply using the wrong shade. Sometimes it takes experimenting to find what shade is best for your skin. I found with Bare Esentuals, I wore a significantly darker foundation than I ever thought possible, yet it was the perfect shade for me.

4. Be sure to moisturize your skin preferably about a half an hour before applying mineral makeup.

5. Apply all your makeup except mascara & lipstick. Spritz a fine mist of water on your face, then finish your mascara and lipstick. I find this “sets” the makeup and gives a very fresh, young looking appearance.

6. Play with the colors and applications. You can use blush colors as eyeshadow. You can also brush on your lips, then apply some gloss over top.

7. The eyeshadows will tend to look shockingly stark when you first apply them. Don’t worry too much about that. After you apply the shadow, take a clean eyeshadow applicator and use it to blend and soften the colors. They will soften right down to the perfect hue in most cases.

Ebay many times have great deals on trying different samplers of different brands and colors. You can have a blast trying. Many different companies also sell small samples very reasonably priced to try as well. Remember, a little goes a long way. Have fun trying this wonderful category of makeup. (face painting)


Becoming a Makeup (Face Painting) Professional

If you have decided to become a professional makeup artist (I call face painting), the first step is to find a makeup artists school. Get as many information about all the schools in your country as possible and decide which one is best for you. Also check out other makeup artist programs and online courses. Also try to learn by yourself how to apply makeup as a professional: assessing the client (coloring, face shape, skin type), preparing the face, applying makeup (foundation, eye makeup, blush, lip color, etc.) and completing the look.

Try to do makeup for print photography; it's a very important part of this job, to know the difference between live makeup and makeup for photography's. Another important thing is to learn how to do character makeup (film and television, theater, special effects makeup), what to have in you kit (different types of makeup and application tools), how to keep up with makeup trends, how to quickly get experience through volunteer work and apprenticeship.

While starting your makeup artist career, find out how to create an impressive portfolio even if you have no previous paid makeup artist experience. Discover who employs makeup artists and try to contact them, including: salons and spas, retail stores and cosmetics companies. Where makeup jobs are advertised, find out what employers are looking for and how to make a good impression in an interview, do your best to find the job where you could get valuable experience.

Of course if you decide to be makeup artist because this job is interesting and has many benefits, you have to understand that it won't come at the moment. You have to be very patient, do the best you can to become a real professional; you have to be very keen on what you do and only when you'll become a really successful makeup artist. You have to be excessively up-to-date and communicative. Good communication skills are very important in such profession, because if you'll become a famous makeup specialist, you'll have to learn how to deal with various people, well-known persons who sometimes have a rather difficult character.

If you belong to some salon, spa or anything of this kind, you won't be able to choose your clients and will have to pay some money to your employer, yet the advantage is that you won't have to search for clients yourself and you will be sure that you'll get some money. However, if you will become well-known makeup professional, clients will search for you and your earnings will be higher. Commonly famous artists establish their own salons and hire people to do the job. If you enjoy making people beautiful, communicating with famous people, you may work independently.